Table of Contents
Creating a Second Activity as a content area for the Application
If you’ve landed here without the first step, please follow this link here: How to create apps with no coding & Admob integration (step one)
step two continues….
Go back to your main menu (where we first started ) click on the main.xml at the button of your screen, then click on the + to add new view.


After clicking the add button, enter view name as flashcreen, then untick statusbar and toolbar, then add/save it.
Creating The Content Layout
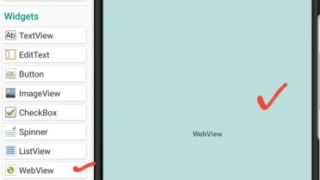
This part is very easy we are just adding a webview

Now just like the previous step, the same way you created that flashcreen, create another and name it main1, because the name main already exist. just name it main1, then make sure the toolbar and the statusbar are both selected, then add. Now at the buttom left, drag the progressbar and webview, then drop it to your template phone.

Adding Events to the Webview for better performance
Go to Events , then at the top left, click Views, now click on the Add new at the buttom right and select both eWebview onPageStarted and onPageFinishd, then add both.
Now click on onPageStarted, then add this block and do the necessary thing you see below (Screenshot)

And then, add this to the onPageFinished event

That little piece of work will make the Progress visible only when the Webpage is loading.
Adding multiple Activity Events: OnCreate and onBackButtonPressed
We are making use of this data for the title of the page and the content. Remember the Intent data we previously did? You remember the main1 activity you created earlier? go back to it, if you are on the activity, good to go.
Now go to event, click on activity at the top left , then click on onCreate. Add this following settings below:

Please make sure you use the right block, check block colors to help you find them faster. And also, blocks can be laid on each other, make sure you look closely!
Let move to onebackpressed event, which is on the same main1 actvity you currently on. Now click on onebackpressed, if you dont see any, click on the plus icon on a red circle at the buttom right. Then add onebackpressed.
Now add these blocks beloow for onebackpressed, just like the way you did onCreate.

Alwyas click the black arrow close to any block you see, if any! then select what blcok you picked.
Continue reading here: Step Three on How to create apps with no coding & Admob integration