Table of Contents
HOW TO CREATE AN APP & HOW TO INTEGRATE ADMOB FOR MONETIZATION
Making an Android App is not as difficult as you think, especially when you are making a WebView Application, which is what I’ll be teaching you.
The best thing about this tutorial is, you don’t need a Laptop or Desktop device to participate. In fact, what this article is going to teach is: How I made an Android web app that looks more than just a
web app with the use of a tool called Sketchware.
What is Sketchware?
Sketchware is an integrated development environment (IDE) inspired by the language Scratch, which allows you to develop, compile, and build an Android application directly on your smartphone, without any help from a PC. This Application is
just like the Android version of Android Studio, lol, and the best thing about it is that you don’t need any coding knowledge to be able to develop good stuff.
Link to the app: https://m.apkpure.com/sketchware-create-your-own-apps/com.besome.sketch
The ads shown here might be pretty annoying. if you don’t like the ads, you can purchase the pdf file here: Tutorial on how to Create your app with no coding & Admob integration
Creating A Simple Web view App from Scratch with Sketchware
Please before going any further, make sure you have downloaded and installed Sketchware on your mobile device.
Let get started!
Lunch the Sketchware app and create a new project.

The next page is where you would see options to set your Application Name, Toolbar Color, AppIcon, Project Name, and Package Name.

Now you will arrive at the main page of the newly created project.
Preparing the layout and design of the App’s homepages in Sketchware
So it’s time for us to make a simple homepage for the Application. The homepage is only going to show the Categories of the Blog (Remember: I am making a “Blog” (website) App), so I already have some images prepared.
My prepared images.
I designed each of the categories differently, you can use Canva to design yours.

Now on your main page screen, locate the ScrollV, drag it and drop to the phone template.

Now Click that Width in the image below and Make it match_parent.


locate Padding on your screen(close to width and Height, tap it and change the
figure to 0, then save. Now right from where you took the ScrollV, look closely, you’ll see a Linear(v), drag it and drop it off your phone template, and set both it’s height and width to match _parent and also set it’s Padding to 0, then save.

The next step is to gradually drag and drop, 4 Linear(H) in the previously inserted LinearV, after you are done dragging, it will look like this:

After this is done, insert two ImageViews in each of the LinearH. you can see the imageviews from your panel, just drag and drop.This ImageView will be used to display our Images and make them clickable.
Note: To make our Images perfect, it needs to be aligned to the center, to make this, tap on each LinearH, tap on it’s gravity and tick center_horizontal and center_vertical.

Now it’s time to insert images in the ImageView, see screenshot below.


Next step is to select the specific image for that ImageView. Make sure you click each imageview, then upload your images one after the other. And make sure you name your images like blogging, domain etc. as seen on my images. Then, I’ll repeat that step for all the ImageView.
Note: If you only see default images, you can upload all your images to sketchware by clicking the image icon at the top right corner, then, follow previous step.

Now we have to change the Background Color of the ScrollV. This is to make everything in the app match together. just select the ScrollV from the phone template ( The ScrollV you droped at the beginning of this tutorial) After you have clicked on the ScrollV, Click on “See All” at the buttom right corner, and then, click on “Background Color”

The Background Colour Page, you can select any colour you want, I personally used blue so it can match with the Category Images. You can pick a different color.

Now we done with the App’s Homepage design, you can see it wasn’t that hard?. We are going to move to the Activity.java of the Homepage. This is the field where you can define the functions of the application.
Programming the MainActivity.java (Function of the Homepage)
Now it’s time to program the main functions of the application. We just have to modify the onCreate Activity of the App and the onClicked event for all the Categories images we previously inserted. We start by clicking on Events as seen on your screen.

After clicking on the events, then click on MoreBlock at the buttom left. Then click on Shared MoreBlocks and search for Actionbar Subtitle.

Now import the actionbar you just downloaded to the app by clicking on import from collection from the Event, then select.

After importing the Actionbar Block into the App, head back to Activity at the top left, then, clcik on oncreate.
PAY ATTENTION TO THIS PART!
WE WOULD START WORKING ON BLOCKS (OR WE CALL IT LEGO?) HA!
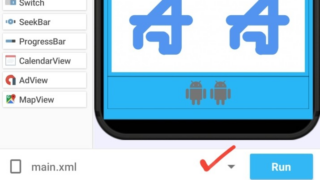
Before i proceed, this is where you’ll find all kind of blocks, by clicking that puzzle icon in a blue round shape.
Block categories:
- Variable – View
- List – Component
- Control – More block
- Operator
- Math
- File

To use any block, hold and drag, then drop to wherever you want or i ask you to for this tutorial
After heading to Activity, and after clicking on oncreate, now add the Actionbar block to the oncreate block that was there and input “Categories” inside the empty box of the Action bar.


The next step is to go to Views under event and click on the “+” button at the bottom right of your screen.

Select all the Images which you’ll like to tag an action to and add them.

Now we are going to:
- Create an Intent Component
- Set some specific data that’ll be passed over to the next activity whenever the Image is clicked!
We’ve previously inserted Images for each category for the app, now we are going to add an action that’ll make the images clickable and linkable.
After selecting and adding all the images from the previous step, now you’ll have to click an image, make sure you have named those images right from the beggining where i showed you how to, so you won’t get confused while inputting links.
i’m sure you know where to find the Blocks now. Head to the blocks, Go to Component, then click on “add component” There will be a pop up with different component, just click the very first one which is “Intent” then Add.

Name it intent.if intent did not go through, just name it intent1, or intent01
Now look at the screenshot below and make sure you add the right block. Add all the block you see below and Checkthe block name and color to identify them easily.

The blocks you need to add to each image categories.This screenshot is for the entertainment category.
Add all this blocks as shown in the previous step to all the other image categories. Do not worry, they all have the same block, we only need to change each category link in the box has sown in the previous screenshot. There is one more thing you need to know, for every block you add, make sure you always click the little black arrows facing down close to each block and click on whatever block you use.
Now let me show another example of a different image category. The previous image was for entertainment category, and this screenshot below is for the theme category.

just do all that to all your image categories, but make sure you place each of thier links.
You might start getting confused now. where did the links come from? Good point. Remember we are making a web app, so you must have had a website you are wanting to transform to an app. for this tutorial for my app, i made used of a free website from blogger.com. i copied the link of each categories i had; Blogging, Domain, Themes, Widgets, Business, Technology, Entertainment, and news. all the links to this categories was used on the the oncreate for image categories ( previous screenshot)
If you have your custom website, you can play around with this and use a different category, with a different link. it’s not a rocket science you just have to play more around with this.
Okay, let get back to where we stopped.
Please save your work always.To save your work, click the save icon at the top right corner of the sketware app.
Continue reading here: Step Two on How to create apps with no coding & Admob integration